Solar Panel Store Blog — grid tie solar

Solar Home Grid-Tie System Sizing Part 3: Small System Economics
In part three of this series we are now going to look at a grid tie system based on a small budget instead of roof space or total energy off-set. Even a solar array that won't off-set all of your usage will pay for itself fairly quickly while saving money on your electric bill each month, and can be expanded in the future as well.
In this example, I'm using the parts list detailed below, which, aside from some site specific wire runs is a fairly complete package for a roof mounted grid-tie system.
6 - Peimar 310W Black Solar Panels
1 - SMA SunnyBoy 3000W Grid Tie Inverter W/SPS
1 - 30 Ft MC4 Solar Panel Cable Extension Wire
1 - Roof Top Junction Box / Combiner Box
1 - SnapNRack Roof Mounting System (4 - 122 Inch Black Rails / 2 - Rail Splice Bars / 10 - Black Mid Clamps / 4 - End Clamps / 4 - Black Rail End Caps / 8 - Black Mounting Feet w/Flashing for Comp Shingle Roof / 8 - Lag Bolts / 1 - Rail Grounding Lug)
This package would come in at 1.86 kW (1,860 W) and cost $3,000 or less depending on some of the specific components.
It's important to make sure that under different conditions an array this small will still work well with the inverter we are using, which is obviously over-sized in comparison to the array. Many inverter manufacturers offer "String Sizing" tools on their website, I also personally like to use the MidNite Classic string sizing tool just for the data it provides to double check with the inverter specs in all different kinds of systems, it's handy as I can get the following results for this particular set-up quickly.
Array Specs:
Number of Panels In Series: 6
Number of Parallel Strings: 1
Total Modules: 6
Rated PV Array Power: 1860 Watts
Anticipated Array Power @ 104 F: 1748 Watts
Rated PV Array Current: 9.51 Amps
VMP (Maximum Power Point Voltage): 195.6 Volts
VOC (Open Circuit Voltage): 244.2 Volts
VMP @ -22 F: 238.8 Volts
VOC @ -22 F: 287.4 Volts
SunnyBoy 3.0 Inverter Specs:
Max. usable DC power: 3100 W
Max. DC voltage: 600 V
Rated MPP voltage range: 155 - 480 V
MPPT operating voltage range: 100 – 550 V
Min. DC voltage / start voltage: 100 V / 125 V
Max. operating input current per MPPT: 10 A Max.
Short circuit current per MPPT: 18 A
For small systems like this, micro-inverters like Enphase Products are also a great choice, and you really don't need to worry about any of these little details as each solar panel uses it's own inverter, so a single panel system could even be taken into consideration.
I used the SMA SunnyBoy for this kit for a few reasons though. First, it's a great product and this system could be added to in the future without much additional cost per watt, which will keep the payback time nice and low. Another thing I really like about the SMA SunnyBoy line is a unique feature known as SPS, or Secure Power Supply. This feature allows a home owner to dedicate their array power to a dedicated outlet which provides up to 2000 W of power depending on the conditions, with this particular array you'd probably expect around 1800 Watts of available power given good solar panel orientation and sunlight - without requiring a battery bank, charge controllers or other hybrid system components.
As a side note, this SPS feature could be used to charge a battery bank for emergency use using a lower cost standard battery charger and low cost inverter, because not everybody really needs the best of the best for a quick black out scenario, and these types of systems can also be fairly cost prohibitive if you're on a tight budget.
Going back to the simple payback methods described in the last blog post, I'll be using PV Watts to calculate the predicted system payback time. Here are the specs I'm using for PV Watts:
System Info:
DC System Size (kW): 1.860
Module Type: Premium
Array Type: Fixed Roof Mount
System Losses (%): 14.08 (Default Loss Calculations)
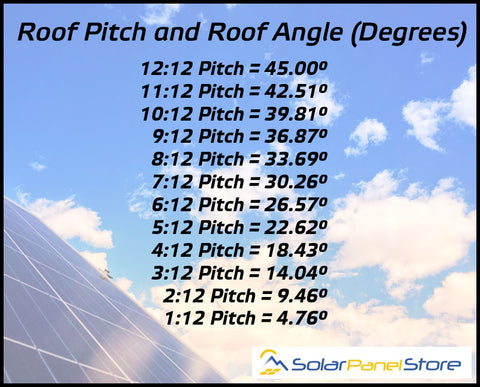
Tilt (deg): 26.57 (6:12 Roof Pitch, See last blog post for a roof pitch to degrees chart)
Azumuth (Deg): 180
NOTE: So far, my favorite online tool to use for determining azimuth angles is provided by Solmetric at the link below, it's a free tool but an account sign-up is required. Link: Roof Azimuth Tool
Retail Electricity Rate:
Rate Type: Residential
Rate ($/kWh): 0.11
Retail Electricity Rate:
Rate Type: Residential
Rate ($/kWh): 0.11
PV Watts Results:
Annual Output: 3,005 kWh/Year* (System output may range from 2,881 to 3,080 kWh per year near this location.)
Annual Average Daily Solar Radiation: 5.72 Hours
Annual Energy Value: $330.00
If we look at the most simple payback method of the original package cost divided by the annual energy value, we come up with 9.09 years to payback. Taking the Federal Residential Renewable Energy Tax Credit of 30% into consideration, that number drops down to 6.36 years. There could and usually are state, local, and utility rebates that Solar Grid-Tie systems would qualify for as well that would drop this even further! Check out the Database of State Incentives for Renewables & Efficiency
Thanks for reading, hopefully this inspires you to check into a system for your home, the sooner it's on the roof the sooner it's going to pay for itself! Our team is always here to help from designs to sale and into the future as a new friend of the solar crew!

Solar Home Grid-Tie System Sizing Part 2: The DIY Solar Site Evaluation
In part two of Solar Home Grid-Tie System Sizing we will take a look at a quick and easy method of doing your own site evaluation and estimating available roof space, without the need to break out the ladder! Using google maps, it's fairly simple to look into potential shading problems, roof orientation, and roof size.Using https://www.google.com/
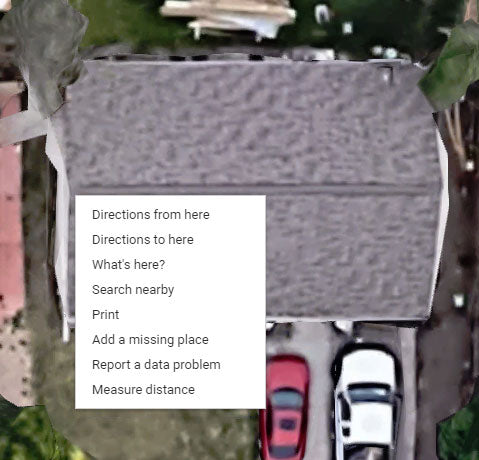
Here is an example of an ideal roof layout, southern facing, with no vents or other obstructions.

Estimating the roof space available is pretty quick and simple, right click a corner of the roof, and select Measure distance.
Now, simply click the next point you would like to measure to.
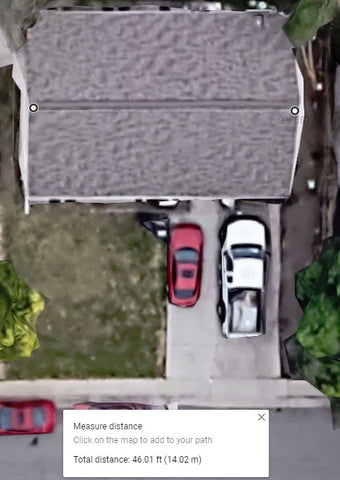

Now that we have a width distance (Approximately 46 ft), we can check the height. Right click again and clear the measurement to start new points, or you can simply move of of your black and white dot markers.

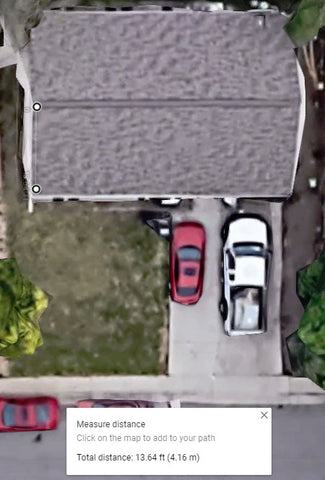
Now we have our width and height measurement to work off of, approximately 46 x 13.50 ft. and we can look at array sizing.


Now we have our width and height measurement to work off of, approximately 46 x 13.50 ft. and we can look at array sizing.
There are many types of solar panels on the market, for most rooftop grid tie systems, we will want to be looking at either a 60 cell or 72 cell solar panel with high efficiency. I think that the Mission Solar 305W - MSE305SQ8T solar panel would be a great choice for this application, it has an efficiency of 18.65% and an all black appearance that would look great! This solar panel measures in at 65.53" x 39.33", or 5.46 x 3.27 ft.
Dividing the roof width by the solar panel width shows 14.06, so I would say that it would be comfortable to estimate that we can have columns consisting of thirteen solar panels. Dividing the roof height by the solar panel height shows 4.12, so again I would be conservative and stick with three rows of solar panels. The entire array would consist of 39 solar panels. We are using a 305W solar panel in this example, so the array power comes to 11,895 W (11.895 kW).
If you read part one of system sizing, you may have an idea of the size of array you are looking for based on your current electrical usage. So how much power per month or year could this system generate? NREL provides an excellent tool called PV Watts to calculate this which can be found here: https://pvwatts.nrel.
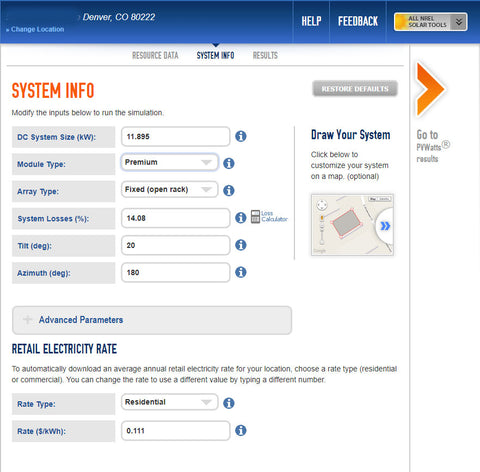
Note that DC System Size is in kilowatts (kW), not Watts (W), a kilowatt is a measurement of 1000 W of electrical power. If the solar panels you're looking into have an efficiency rating over 18%, I'd consider them in the "Premium" category. The Array Type will most likely be either Fixed Open Rack(Such as a ground mount or pole mounted system) or Fixed Roof Mount. The default tilt setting of 20 Degrees is probably a good choice unless you happen to know this detail, which is easy if you know the pitch of your roof (See our chart below). Azimuth is the direction of the solar array from the observer, expressed as the angular distance from the north or south. North as 0°, east 90°, south 180°, and west 270°. The electricity rate should be pretty close, as these are adjusted based on your address, but if you know your current utility cost and it's different, go ahead and make the appropriate adjustment.
Now just click the orange arrow to go to the results page for an estimate of production:
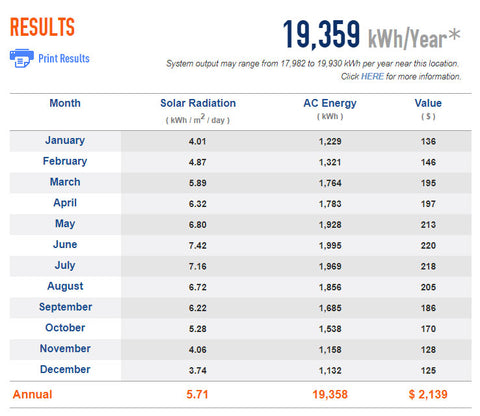 These PV Watts results are generally a bit conservative, and we often see that our customers exceed the PV Watts data, mostly due to the high quality components we like to use that add to production like solar panel optimizers or micro-inverters, and the great design service our team is happy to help you out with!
Dividing the roof width by the solar panel width shows 14.06, so I would say that it would be comfortable to estimate that we can have columns consisting of thirteen solar panels. Dividing the roof height by the solar panel height shows 4.12, so again I would be conservative and stick with three rows of solar panels. The entire array would consist of 39 solar panels. We are using a 305W solar panel in this example, so the array power comes to 11,895 W (11.895 kW).
If you read part one of system sizing, you may have an idea of the size of array you are looking for based on your current electrical usage. So how much power per month or year could this system generate? NREL provides an excellent tool called PV Watts to calculate this which can be found here: https://pvwatts.nrel.
Note that DC System Size is in kilowatts (kW), not Watts (W), a kilowatt is a measurement of 1000 W of electrical power. If the solar panels you're looking into have an efficiency rating over 18%, I'd consider them in the "Premium" category. The Array Type will most likely be either Fixed Open Rack(Such as a ground mount or pole mounted system) or Fixed Roof Mount. The default tilt setting of 20 Degrees is probably a good choice unless you happen to know this detail, which is easy if you know the pitch of your roof (See our chart below). Azimuth is the direction of the solar array from the observer, expressed as the angular distance from the north or south. North as 0°, east 90°, south 180°, and west 270°. The electricity rate should be pretty close, as these are adjusted based on your address, but if you know your current utility cost and it's different, go ahead and make the appropriate adjustment.


Now just click the orange arrow to go to the results page for an estimate of production:

Solar panels for homes and full system packages are at an all time low cost right now. Looking at these numbers it's easy to come up with payback results. Full grid-tie roof mount packages can run around $1.30 / W or less, so looking at pay back even before federal tax credits and local utility rebates (which can drastically reduce costs), this system would pay for itself in around 7 years, and it's free energy from there, not a bad return on investment!
- Loren Geist
- Tags: Grid-Tie Solar Solar Estimate Solar Home Solar Info Solar Panel Design Solar Panels for Home

Solar Home Grid-Tie System Sizing Part 1: Using a Utility Bill
Grid-Tied (a/k/a “grid interconnected”) solar systems are the most common and simple types of solar electric systems homeowners install. These complete solar power systems are connected to the utility grid and generate electricity while the sun is shining and the grid is running. If the system produces more energy than your home uses, then the system sends (sells) the excess energy back to the grid, which would offset any electricity you buy from the utility at night (check with your utility provider for details, as these policies vary).
If you consume more energy than your system is able to generate, then the utility would supply your additional energy demand as usual. Grid-tied solar panel power systems are great for reducing your energy bill.
Sizing a system can seem confusing at first, mostly due to the flexibility of sizing a grid-tie system. We can base a system on a certain amount of production to off-set current usage, to fit into a budget, or to just take advantage of the roof-space available to install the solar panels on.
Figuring out the size of system to offset current usage is pretty straight forward and simple though, so we will start the series off with this. Here is an easy method to help you figure out the correct solar panel array size for your home.
Step 1: Find your monthly average electricity usage from your electric bill.This will be in kilowatt-hours (kWh). Due to air conditioning, heating and other seasonal usage, it is a good idea to look at several bills. You can add the typical summer, fall, winter and spring bills and divide by four to find the average monthly usage.
Step 2: Find your daily average electricity use. Divide the monthly average number of kWh use by 30 (days).
Step 3: Find your location's average peak sun hours per day. Find what is known as an insolation map, or average sun hour list. For example, Colorado is around 5 peak sun hours. Alternatively, a PV Watts is a great online tool from NREL that will provide great insight for month by month and average solar radiation for your specific location. (https://pvwatts.nrel.gov/)
Step 4: Calculate the system size to provide 100% of your electricity. Divide your daily average electricity use by average sun hours per day. For example, if the daily average electricity usage is 30 kWh, and the site is in Colorado, system size would be: 30 kWh / 5 h = 6 kWh. It's a good idea to multiply this number by 1.15 in order to account for factors such as inverter efficiency, dirt or pollutants that may accumulate on panels, etc., if you want to cover all of your use. (One of our solar home packages in the 7 kW range would be great for this!)
Take a look at some of our system options for grid-tie packages here, or contact our sales team for more information, we are eager to help out and provide you with everything you need to go solar!
- Loren Geist
- Tags: grid tie solar Learning Solar Solar Basics Solar Panels solar size